 or press the Scan key to review the records currently
on file and select one for editing or viewing.
or press the Scan key to review the records currently
on file and select one for editing or viewing.Use this function to perform normal file maintenance on the Chart of Accounts (similar to Chart of Accounts File Maintenance) and, in addition, in Initial Setup only, to enter/edit account balance information by fiscal year. These balances include monthly, SOY (Start of Year), EOY (End of Year), Source, Use, and Neither amounts for each fiscal year.
The Chart of Accounts Screen, shown in Figure 5-7 below, appears when
you select Account Balances from
the Holding Files Pulldown Menu.
You normally enter this function in Inquire mode but you can change mode
by using the mode icons on the toolbar or the mode function keys. Since
Change mode places a hold on the selected record, use Change mode only
when you intend to change data. If desired, in key entry, you can click
on or press the Scan key to review the records currently
on file and select one for editing or viewing.
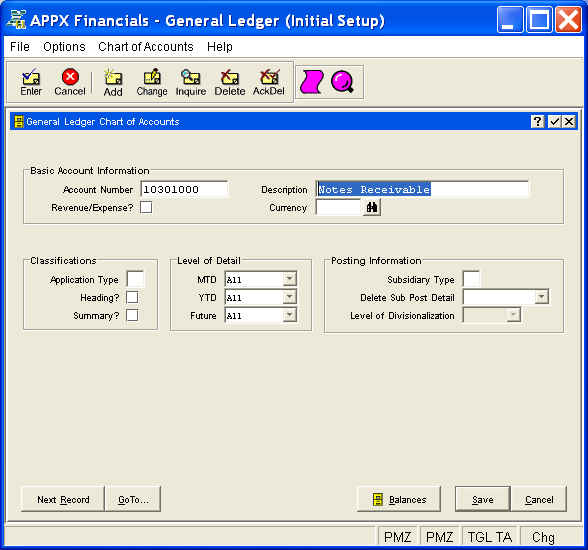
Figure 5-7. Chart of Accounts Screen
This screen contains the following fields grouped by sections.
Enter the number for this account, up to 12 characters in length. This number will be used in all accounting applications to identify this account. Note that this field can contain alphanumeric characters even though it is generally referred to as the account number.
Enter a description for this account, up to 30 characters in length. The account description normally appears beside the account number whenever it is displayed on other screens and reports.
This field controls whether or not the account is treated as a Revenue/Expense
account. Select "no" or  for a Balance Sheet account
(which, when changed, will not impact Current Earnings). Select "yes"
or
for a Balance Sheet account
(which, when changed, will not impact Current Earnings). Select "yes"
or  for a Revenue/Expense account (which, when changed, will
impact Current Earnings). The initial default is "no".
for a Revenue/Expense account (which, when changed, will
impact Current Earnings). The initial default is "no".
If applicable, enter the currency code for the account, up to 6 characters
in length; otherwise, leave this field blank. If entered, this code must
be on file in the Exchange
Rates file. You can click on or press the Scan key
to find an appropriate entry. The system displays the currency description
so that you can verify your entry.
Currency code identifies the currency in which the account balances are maintained. For each record that is entered with a non-blank currency, an equivalent record must be added to the Foreign Accounts file thru Foreign Accounts File Maintenance, since each foreign balance amount is maintained by the system in both foreign and home (domestic) currency amounts. An example of an account with a currency code might be "Cash, Canadian".
Enter up to two uppercase letters, such as AP, AR, FA, GL, IC or PA, or leave blank.
Application Type is used to validate specifying this account number within a given application. This is accomplished by comparing it against the OK Application Types defined in the Parameters file for that application. For example, you might define your revenue accounts as having an application type of "AR", for Accounts Receivable, and your expense accounts as having an application type of "AP", for Accounts Payable. If the Accounts Payable Parameters file included "AP" as an OK Application Type, but not "AR", the system would prevent you from inadvertently entering a revenue account on, say, an Accounts Payable invoice. At the same time, as long as General Ledger included both "AR" and "AP" as OK Application Types in Parameters File Maintenance, journal entries could be made to either revenue or expense accounts.
Select "yes" or if this account is a heading
account; otherwise, select "no" or . The initial
default is "no".
Heading accounts are used to format financial statements, and for separating accounts on the Trial Balance Report and Chart of Accounts List. They contain no actual data and will never have any amounts posted to them. An example of a heading account might be "Current Assets".
Select "yes" or if this account is a summary
account; otherwise, select "no" or . The initial
default is "no".
Summary accounts represent the total, or sum, of a grouping of other account balances. They will never have amounts posted directly to them; they are updated only during Process Initial Setup or when the 'Summarize Accounts' function is run in Live Operations. An example of a summary account might be "Total Expenses", which could be defined as the sum of all expense accounts.
You must also enter summary accounts in Summary Accounts File Maintenance.
You have the following options for the Level of Detail fields for MTD, YTD, and Future (referring to the MTD Postings, YTD Postings, and Future Postings files respectively):
|
None: |
Keep no detail (not applicable for MTD or Future Postings) |
|
Summary: |
Keep a summary by fiscal month/year |
|
Journal: |
Keep a summary by fiscal month/year and journal code |
|
Operator: |
Keep a summary by fiscal month/year, journal code, and operator ID |
|
Date: |
Keep a summary by fiscal month/year, journal code, operator ID, and date |
|
All: |
Keep all detail |
These options are listed in order of "least detail" to "most detail". All entries containing an intercompany code or a subsidiary code will be kept in detail. Also, be sure to keep at least as much detail in the Future Postings file as you want to maintain in your MTD and YTD Postings files for a given account.
Click the list  button to select the level of detail
to be kept in the MTD Postings file as defined above. The initial default
value is "All". "None" is not a valid option for this
file.
button to select the level of detail
to be kept in the MTD Postings file as defined above. The initial default
value is "All". "None" is not a valid option for this
file.
Click the list button to select the level of detail
to be kept in the YTD Postings file as defined above. The initial default
value is "All".
Click the list button to select the level of detail
to be kept in the Future Postings file as defined above. The initial default
value is "All". "None" is not a valid option for this
file.
If applicable, enter up to two uppercase letters for the cost accounting subsidiary to which this account is posted; otherwise, leave this field blank. If this is a General Subsidiary account, enter "GL". See General Subsidiary in Chapter 1 of this manual for more information.
For accounts with Subsidiary Type "GL" only, this entry indicates
how often General Subsidiary detail postings are deleted from the Subsidiary
Postings file. If applicable, click the list button to
select one of the options listed below; otherwise, leave this field blank.
|
Never: |
Never delete |
|
Monthly: |
Delete during Close Month processing each month |
|
Yearly: |
Delete only at the end of the fiscal year |
|
This Month: |
Delete at the end of this month |
Note: An entry of "This Month" in this field will be reset to "Never" after the detail has been deleted.
When implemented, this field will provide for divisionalized accounting by appending account components from the offset account to the primary posting account. This feature has not been implemented.
Press ENTER or click  or the Save
button to save the information for the current record. If any information
has changed, the system may redisplay the screen to show any new or changed
system-supplied items or to report any error or warning messages. If so,
the current record has not yet been saved; you must address any concerns
and press ENTER or click or the Save
button again. To exit without saving, press END or click
or the Save
button to save the information for the current record. If any information
has changed, the system may redisplay the screen to show any new or changed
system-supplied items or to report any error or warning messages. If so,
the current record has not yet been saved; you must address any concerns
and press ENTER or click or the Save
button again. To exit without saving, press END or click  or the Cancel
button.
or the Cancel
button.
When you save a record, the system will automatically present the Account Balances Overlay; otherwise, click on the Balances button to access it (which first saves the current record if applicable). However, if the account is a heading account, this overlay does not apply and will not appear.
The following icons are also available for use on the toolbar (unless disabled in Add mode or until a record has been selected):
 List Chart of Accounts:
See Chart of Accounts List for
further information.
List Chart of Accounts:
See Chart of Accounts List for
further information.
 Display Account Audit
Info: See Audit
Info for further information.
Display Account Audit
Info: See Audit
Info for further information.
Click the appropriate icon to perform the desired operation (which first saves the current record if applicable), after which you will return to where you are.