If the allocation method for the receiving account is "Ratio", the Allocation Receiving Account Ratio Detail Overlay, shown in Figure 4-9b below, appears automatically when you save a record or when you click on the Ratio Detail button from the Allocation Receiving Accounts Overlay in Allocation Accounts File Maintenance. This overlay addresses supplementary fields for the receiving account that pertain only if the allocation method is "Ratio". You remain in the same mode and, if you change mode from this overlay, the new mode returns you to the Allocation Receiving Accounts Overlay instead.
The ratio detail overlay is where you define the particulars of the ratio controlling the distribution of the current balance from the allocation account to the selected receiving account. This ratio can utilize total account balances from the Chart of Accounts or Unit Accounts files.
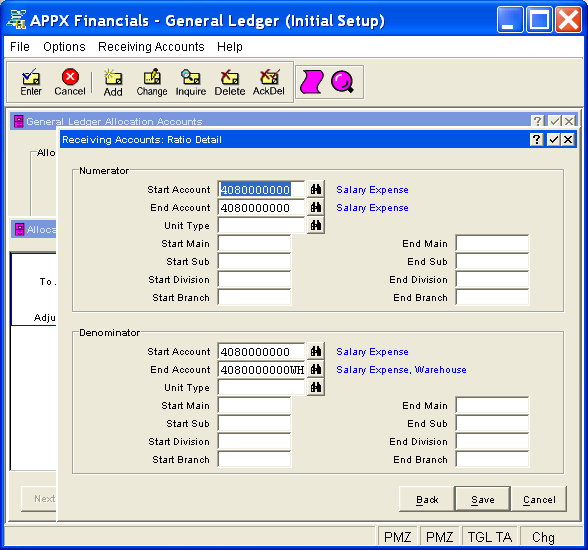
Figure 4-9b. Allocation Receiving Account Ratio Detail Overlay
This overlay contains the following fields grouped by sections and defines the ratio for the selected receiving account. This ratio (numerator/denominator) will be multiplied by the current balance in the allocation account, and the result will be distributed to the receiving account.
The numerator is defined as a range of accounts from the Chart of Accounts or Unit Accounts files. The balances for these accounts are summed to compute the numerator of the ratio.
Enter the first account number or the beginning point of the range to
be totaled for the numerator. You can click on  or press
the Scan key to find an appropriate entry. If a valid account, the system
displays the account description; otherwise, a warning is issued for information
only.
or press
the Scan key to find an appropriate entry. If a valid account, the system
displays the account description; otherwise, a warning is issued for information
only.
Enter the last account number or the ending point of the range to be
totaled for the numerator. You can click on or press
the Scan key to find an appropriate entry. If a valid account, the system
displays the account description; otherwise, a warning is issued for information
only.
If these accounts are defined in the Unit
Accounts file, enter a valid unit type. If entered, unit type must
be on file in the Types file.
You can click on or press the Scan key to find an appropriate
entry. The system displays the type description so that you can verify
your entry.
Leave this field blank to indicate the accounts are defined in the Chart of Accounts file.
For the numerator account component fields below, the system uses the descriptions you assigned in Parameters File Maintenance to customize the labels displayed on the screen. You can only make entries in the component fields that are defined in your account structure.
Enter the low value for the first component of the account if you want only certain first components included in the defined account range; otherwise, leave this field blank.
Enter the high value for the first component of the account if you want only certain first components included in the defined account range; otherwise, leave this field blank.
If applicable, enter the low value for the second component of the account if you want only certain second components included in the defined account range; otherwise, leave this field blank.
If applicable, enter the high value for the second component of the account if you want only certain second components included in the defined account range; otherwise, leave this field blank.
If applicable, enter the low value for the third component of the account if you want only certain third components included in the defined account range; otherwise, leave this field blank.
If applicable, enter the high value for the third component of the account if you want only certain third components included in the defined account range; otherwise, leave this field blank.
If applicable, enter the low value for the fourth component of the account if you want only certain fourth components included in the defined account range; otherwise, leave this field blank.
If applicable, enter the high value for the fourth component of the account if you want only certain fourth components included in the defined account range; otherwise, leave this field blank.
The denominator is defined as a range of accounts from the Chart of Accounts or Unit Accounts files. The balances for these accounts are summed to compute the denominator of the ratio.
Enter the first account number or the beginning point of the range to
be totaled for the denominator. You can click on or press
the Scan key to find an appropriate entry. If a valid account, the system
displays the account description; otherwise, a warning is issued for information
only.
Enter the last account number or the ending point of the range to be
totaled for the denominator. You can click on or press
the Scan key to find an appropriate entry. If a valid account, the system
displays the account description; otherwise, a warning is issued for information
only.
If these accounts are defined in the Unit
Accounts file, enter a valid unit type. If entered, unit type must
be on file in the Types file.
You can click on or press the Scan key to find an appropriate
entry. The system displays the type description so that you can verify
your entry.
Leave this field blank to indicate the accounts are defined in the Chart of Accounts file.
For the denominator account component fields, the system uses the descriptions you assigned in Parameters File Maintenance to customize the labels displayed on the screen. You can only make entries in the component fields that are defined in your account structure.
For itemized descriptions of the account component fields for the denominator, see the respective fields for the numerator above.
Press ENTER or click  or the Save
button to save the information on this overlay. If any information has
changed, the system may redisplay the screen to show any new or changed
system-supplied items or to report any error or warning messages. If so,
the current screen has not yet been saved; you must address any concerns
and press ENTER or click or the Save
button again.
or the Save
button to save the information on this overlay. If any information has
changed, the system may redisplay the screen to show any new or changed
system-supplied items or to report any error or warning messages. If so,
the current screen has not yet been saved; you must address any concerns
and press ENTER or click or the Save
button again.
When the screen has been saved, you will return to the Allocation
Receiving Accounts Overlay. To return without saving the screen, click
the Back
button. To return to the Allocation
Accounts Screen without saving this screen, press END or click  or the Cancel
button.
or the Cancel
button.
The following icons are also available for use on the toolbar (unless disabled in Add mode):
 List Allocation Accounts:
See Allocation Accounts List
for further information.
List Allocation Accounts:
See Allocation Accounts List
for further information.
 Display Receiving Account
Audit Info: See Audit
Info for further information.
Display Receiving Account
Audit Info: See Audit
Info for further information.
Click the appropriate icon to perform the desired operation (which first saves the current screen if applicable), after which you will return to where you are.