 or press the Scan key to review the records currently
on file and select one for editing or viewing.
or press the Scan key to review the records currently
on file and select one for editing or viewing.Use this function to define unit type and account number combinations and, in Initial Setup only, to enter monthly unit balances by fiscal year for each such unit/account combination. Each balance is given in a non-monetary denomination, such as "machine hours".
An example of the use of a unit account might be to track machine hours for equipment, or miles accumulated on company cars, or the number of defective parts discovered on an assembly line. Statistical information can then be gleaned from the Unit Balances History Report.
The Unit Accounts Screen, shown in Figure 5-8 below, appears when you
select Unit Accounts from the
Holding Files Pulldown Menu.
You normally enter this function in Inquire mode but you can change mode
by using the mode icons on the toolbar or the mode function keys. Since
Change mode places a hold on the selected record, use Change mode only
when you intend to change data. If desired, in key entry, you can click
on or press the Scan key to review the records currently
on file and select one for editing or viewing.
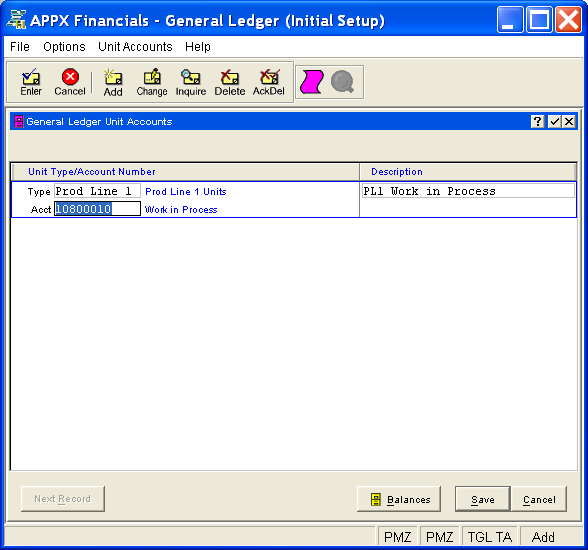
Figure 5-8. Unit Accounts Screen
This is a scrolling screen which contains the following fields for each record:
Enter the unit type. This type must be on file in the Types
file. You can click on or press the Scan key to find an
appropriate entry. The system displays the type description so that you
can verify your entry. In Add mode, this field will automatically be saved
from one unit account record to the next.
Enter the number of the general ledger account to which the unit type
applies. This account must be on file in the Chart
of Accounts file and cannot be a heading or summary account. You can
click on or press the Scan key to find an appropriate
entry. The system displays the account description so that you can verify
your entry.
Enter a description for this unit/account combination, up to 30 characters in length.
Press ENTER or click  or the Save button to save the information
for the current record. If any information has changed, the system may
redisplay the screen to show any new or changed system-supplied items
or to report any error or warning messages. If so, the current record
has not yet been saved; you must address any concerns and press ENTER
or click or the Save
button again. To exit without saving, press END or click
or the Save button to save the information
for the current record. If any information has changed, the system may
redisplay the screen to show any new or changed system-supplied items
or to report any error or warning messages. If so, the current record
has not yet been saved; you must address any concerns and press ENTER
or click or the Save
button again. To exit without saving, press END or click  or the Cancel
button.
or the Cancel
button.
When you save a record, the system will automatically present the Unit Balances Overlay, or you can click on the Balances button to access it (which first saves the current record if applicable).
The following icons are also available for use on the toolbar (unless disabled in Add mode or until a record has been selected):
 List Unit Accounts:
See Unit Accounts List for further
information.
List Unit Accounts:
See Unit Accounts List for further
information.
 Display Unit Account
Audit Info: See Audit
Info for further information.
Display Unit Account
Audit Info: See Audit
Info for further information.
Click the appropriate icon to perform the desired operation (which first saves the current record if applicable), after which you will return to where you are.