Use this function to maintain the Accounts Payable Parameters file, which contains fundamental information defining how the Accounts Payable application operates and interfaces with other applications. This allows you to "customize" your Accounts Payable.
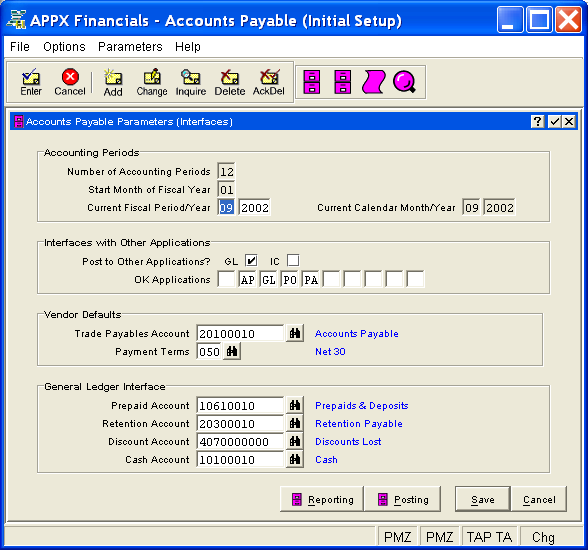
The Parameters (Interfaces) Screen, shown in Figure 4-4 below, appears when you select Parameters from the File Maintenance Pulldown Menu. Parameter information must be entered during Initial Setup in order to establish fields critical to the proper operation of your system. During Live Operations, such fields are display only and cannot be changed.
The Accounts Payable Parameters file is a one-record file although there are three screens of information. Once the Parameters record has been created, you will normally enter this function in Inquire mode. You can change mode between Inquire and Change by using the mode icons on the toolbar or the mode function keys; however, you are not allowed to change mode to Add or Delete. Since Change mode places a hold on the record, use Change mode only when you intend to change data.
Figure 4-4. Parameters (Interfaces) Screen
This screen contains the following fields grouped by sections.
Enter the number of months or periods in your fiscal year. An entry of '12' means that you operate on a monthly basis, and Start Month of Fiscal Year determines which calendar month begins your fiscal year. An entry of '13' means that you operate on a 13-period basis with each period representing 4-weeks, and Start Month of Fiscal Year must be '01'.
If General Ledger is part of your system, this entry is supplied for you and cannot be changed.
If you operate on a monthly basis, enter the first calendar month of your fiscal year. For example, if your fiscal year runs from October 1 through September 30, enter '10'. If you are on a 13-period basis, you must enter '01'.
If General Ledger is part of your system, this entry is supplied for you and cannot be changed.
Enter the fiscal period (or month) and fiscal year to begin "live operations" for Accounts Payable.
If General Ledger is part of your system, its current fiscal period/year is presented as a default but it can be changed.
If you are on a monthly basis, the system displays the current calendar month/year once the previous entries have been validated. Calendar month/year does not apply for a 13-period basis.
Select "yes" or  to direct the system to transfer
information from Accounts Payable to the respective application; otherwise,
select "no" or
to direct the system to transfer
information from Accounts Payable to the respective application; otherwise,
select "no" or  . If an application is not part
of your system, select "no". The default is "no".
. If an application is not part
of your system, select "no". The default is "no".
GL refers to the General Ledger application; IC to Inventory Control.
For each of the ten occurrences, enter up to two uppercase letters, such as AP, AR, FA, GL, IC or PA, or leave the field blank.
OK Application Types indicate the application types that are permissible for account numbers entered within Accounts Payable, such as in Invoices Entry or Adjustments Entry. The application type for an account is determined by the Application Type specified in General Ledger Chart of Accounts File Maintenance on the Details Overlay. If you make any entries here, be sure to include a "blank" type as the first entry in order to allow for accounts without application types. If no restrictions should be applied, leave all these fields blank.
Enter the account number, up to 12 characters in length, to use as the Liability Account default in Vendors File Maintenance, where it can be overridden as needed.
If General Ledger is part of your system, this account number must be
on file in the General Ledger Chart of Accounts file. You can click on
 or press the Scan key to find an appropriate entry. The
system displays the account description so that you can verify your entry.
or press the Scan key to find an appropriate entry. The
system displays the account description so that you can verify your entry.
If desired, enter the terms code to use as the Payment
Terms default in Vendors
File Maintenance, where it can be overridden as needed. If entered,
this code must be on file in the Vendor
Terms file. You can click on or press the Scan key
to find an appropriate entry. The system displays the terms description
so that you can verify your entry.
If General Ledger is part of your system, each of these account numbers
must be on file in the General Ledger Chart of Accounts file. You can
click on or press the Scan key to find an appropriate
entry. The system displays the account description so that you can verify
your entry.
Enter the account number, up to 12 characters in length, to which prepayments are posted. Prepayment entries are optionally made during invoice and hand check entry.
Enter the account number, up to 12 characters in length, to be credited for any amount of liability being retained.
Enter the account number, up to 12 characters in length, to which discount amounts are posted. These discounts can be either earned or lost. If the discounts lost method is used, this account will likely be an expense account and maintain a debit balance. For the discounts earned method, either a revenue account or an expense account may be used. In this case, however, the expense account will have a credit balance.
Enter the account number, up to 12 characters in length, to use as a default for the cash account on checks, where it can be overridden.
Press ENTER or click  or the Save
button to save the information on this screen. If any information has
changed, the system may redisplay the screen to show any new or changed
system-supplied items or to report any error or warning messages. If so,
the current screen has not yet been saved; you must address any concerns
and press ENTER or click or the Save
button again. To exit without saving, press END or click
or the Save
button to save the information on this screen. If any information has
changed, the system may redisplay the screen to show any new or changed
system-supplied items or to report any error or warning messages. If so,
the current screen has not yet been saved; you must address any concerns
and press ENTER or click or the Save
button again. To exit without saving, press END or click  or the Cancel
button.
or the Cancel
button.
In Add mode, when you save this screen, the system will automatically present first the Parameters (Reporting) Screen, then the Parameters (Posting) Screen; otherwise, click on the Reporting or Posting buttons, or the respective icons below, to access these screens as desired (which first saves the current screen if applicable).
The following icons are also available for use on the toolbar (unless disabled in Add mode):
 Reporting Parameters:
Accesses the Parameters (Reporting)
Screen.
Reporting Parameters:
Accesses the Parameters (Reporting)
Screen.
Posting Parameters:
Accesses the Parameters (Posting
Screen.
 List Parameters:
See Parameters List for further information.
List Parameters:
See Parameters List for further information.
 Display Parameters Audit
Info: See Audit
Info for further information.
Display Parameters Audit
Info: See Audit
Info for further information.
Click the appropriate icon to perform the desired operation (which first saves the current screen if applicable), after which you will return to where you are.