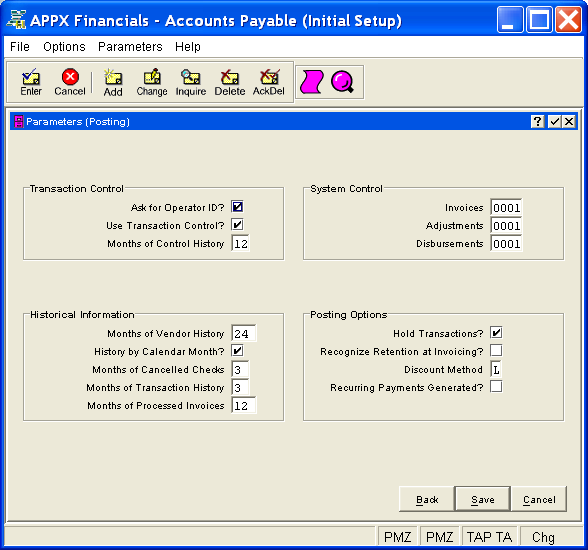
The Parameters (Posting) Screen, shown in Figure 4-4b below, appears automatically in Add mode following the Parameters (Reporting) Screen or in any mode when you click on the Posting button from the Parameters (Interfaces) Screen in Parameters File Maintenance. You remain in the same mode and you cannot change mode from this screen.
Figure 4-4b. Parameters (Posting) Screen
This screen contains the following fields grouped by sections.
Refer to Transaction Control Options in Chapter 3 for a more comprehensive discussion of these options and how they are interrelated.
Select "yes" or  to have the system ask for
the Operator ID of a control group in transaction entry; otherwise, select
"no" or
to have the system ask for
the Operator ID of a control group in transaction entry; otherwise, select
"no" or  . The default is "yes".
The system assumes that you prefer to ask for the operator's ID during transaction entry. This allows you to edit other operators' transactions. If you want to bypass all Control Group screens altogether, enter "no". "No" means that each operator can only enter or edit his or her own transactions. It also means that Use Transaction Control? must be "no".
Select "yes" or to use the system's Transaction
Control feature; otherwise, select "no" or .
The default is "yes".
The system assumes that you want to use the Transaction Control feature. This includes the ability to track and report on the Transaction Control file, which is an additional audit trail; and enter control and hash totals for your transactions.
If Use Transaction Control? is "yes", then Ask for Operator ID? must also be "yes". If you want to use this feature and also want to ensure that an operator has exclusive control of his or her own transactions, enter "yes" in this field, and change the default value of the Operator Exclusive? field on each Control Group record in transaction entry to "yes".
Enter the number of months (up to 2 digits) to keep transaction control history records. The default is "12". Records older than this will be deleted during Close Month processing.
Transaction control history is kept by actual date rather than accounting period or posting month.
Enter the control number (up to 4 digits) to be assigned to the first control group in Invoice Entry in Live Operations. The system maintains this number sequentially. The default is "0001".
Enter the control number (up to 4 digits) to be assigned to the first control group in Adjustments Entry in Live Operations. The system maintains this number sequentially. The default is "0001".
Enter the control number (up to 4 digits) to be assigned to the first control group of disbursements in Live Operations, in either Hand Checks Entry or Checks Creation, whichever is run first. The system maintains this number sequentially. The default is "0001".
Enter the number of months (up to 3 digits) of vendor history to keep on file. The default is "24". During Close Month processing, historical records older than the number of months entered here are deleted.
Select "yes" or if you want to keep vendor
history by calendar month; otherwise, select "no" or to keep vendor history by fiscal period. The default is "yes"
unless you operate on a 13-period basis, in which case the default is
"no". Vendor history must be kept by fiscal period for 13-period
accounting.
Enter the number of months (up to 2 digits) of cancelled checks to keep on file. The default is "3". During Close Month processing, cancelled checks older than the number of months entered here are deleted. Cancelled check records are aged from the check date, not the month in which they are cancelled, in order to determine if they should be deleted.
Enter the number of months (up to 2 digits) of transaction history to keep on file. The default is "3". During Close Month processing, historical records older than the number of months entered here are deleted.
Enter the number of months (up to 3 digits) of processed invoices to keep on file. The default is "12". These invoices are indexed by vendor, and are used by the system to warn when duplicate invoice numbers are entered. During Close Month processing, processed invoices older than the number of months entered here are deleted, along with name and address information for miscellaneous vendor invoices. Processed invoices are aged from either the invoice date or the date paid, whichever is most recent.
Select "yes" or to hold zero-balance invoices
until the Accounts Payable current month reaches the due date month; otherwise,
select "no" or to delete zero-balance invoices
during month-end closing, regardless of their due dates. The default is
"no". Since transactions may be settled before their due date
month, the system needs to know how long to keep invoices with a balance
of zero on file.
Select "yes" or to automatically recognize
a retention amount during invoice posting; otherwise, select "no"
or . The default is "no".
If "yes", during invoice posting, a separate retention invoice record is created for the retention amount specified on the invoice. This amount is credited to the retention account, and the normal liability is reduced accordingly.
If "no", retention invoice records are not created for the retention amount during invoice posting. The retention amount is maintained on the invoice record, and a separate retention record is created later during check posting, if appropriate.
Enter the discount method as 'E' for "earned" or 'L' for "lost". The default is 'E'. This field indicates whether liabilities are to be initially recorded at the full invoice amount ("earned" method) or reduced by the allowable discount ("lost" method).
If the "earned" discount method is used, the liability account is credited at the invoice amount. Discounts are credited only if the liability is paid within the discount period.
If the "lost" discount method is used, the liability is automatically credited at the invoice amount less discount. If the discount isn't taken, the discount account is debited as a lost discount at the time the full invoice amount is paid.
Select "yes" or if recurring payments have
been generated for this month; otherwise, select "no" or . The default is "no".
Press ENTER or click  or the Save
button to save the information on this screen. If any information has
changed, the system may redisplay the screen to show any new or changed
system-supplied items or to report any error or warning messages. If so,
the current screen has not yet been saved and you must address any concerns
and press ENTER or click or the Save
button again.
or the Save
button to save the information on this screen. If any information has
changed, the system may redisplay the screen to show any new or changed
system-supplied items or to report any error or warning messages. If so,
the current screen has not yet been saved and you must address any concerns
and press ENTER or click or the Save
button again.
When the screen has been saved, you will return to the Parameters
(Interface) Screen. To return without saving, press END or click  or the Back
or Cancel
buttons.
or the Back
or Cancel
buttons.
The following icons are available for use on the toolbar:
 List Parameters:
See Parameters List for further information.
List Parameters:
See Parameters List for further information.
 Display Parameters Audit
Info: See Audit
Info for further information.
Display Parameters Audit
Info: See Audit
Info for further information.
Click the appropriate icon to perform the desired operation (which first saves the current screen if applicable), after which you will return to where you are.