In Initial Setup, use this function to enter/edit miscellaneous vendor information. In particular, this is needed to support any transactions entered for miscellaneous vendors through Processed Invoices File Maintenance or Opening Transactions. In Live Operations, this file is system-maintained and cannot be modified.
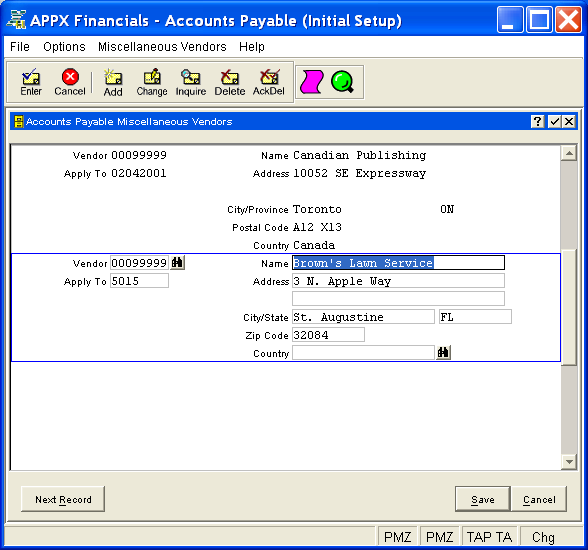
The Miscellaneous Vendors Screen, shown in Figure 4-10 below, appears
when you select Miscellaneous Vendors
from the File Maintenance
Pulldown Menu. You normally enter this function in Inquire mode but
you can change mode by using the mode icons on the toolbar or the mode
function keys. Since Change mode places a hold on the selected record,
use Change mode only when you intend to change data. If desired, in key
entry, you can click on ![]() or press the Scan key to review
the records currently on file and select one for editing or viewing.
or press the Scan key to review
the records currently on file and select one for editing or viewing.

Figure 4-10. Miscellaneous Vendors Screen
This is a scrolling screen which contains the following fields for each record:
Enter the number of the vendor which must be on file in the Vendors
file and must be flagged as a miscellaneous vendor. You can click on ![]() or press the Scan key to find an appropriate entry.
or press the Scan key to find an appropriate entry.
Enter the name of the vendor, up to 30 characters in length.
Enter the apply to of the invoice associated with the vendor, up to 8 characters in length.
Enter up to two lines of address, up to 30 characters in length. You may want to enter the shipping address in the first line and the mailing address in the second line.
Enter the vendor's city, up to 20 characters in length.
Enter the vendor's region, up to 10 characters in length. If the vendor's country is the one defined as USA Country in the System Parameters record, enter the standard 2-letter FIPS state abbreviation (as defined in the States table in the System Parameters record).
The screen label for this field is customized according to the Region Label specified for the vendor's country in Countries File Maintenance.
Enter the vendor's postal code, up to 10 characters in length.
The screen label for this field is customized according to the Postal Code Label specified for the vendor's country in Countries File Maintenance.
Enter the vendor's country, up to 20 characters in length. If entered,
this country must be defined in Countries File Maintenance (accessed from
the Utilities pulldown menu on the main application menu). You can click
on ![]() or press the Scan key to find an appropriate entry. If
no country is entered, country is assumed to be the System
Default Country specified
in the System Parameters record.
or press the Scan key to find an appropriate entry. If
no country is entered, country is assumed to be the System
Default Country specified
in the System Parameters record.
When printing checks, the vendor's address will be formatted according to the Address Format instructions specified for the vendor's country in Countries File Maintenance. Screen labels for region and postal code on this screen are also customized according to the vendor's country.
Press ENTER or click  or the Save
button to save the information for the current record. If any information
has changed, the system may redisplay the screen to show any new or changed
system-supplied items or to report any error or warning messages. If so,
the current record has not yet been saved; you must address any concerns
and press ENTER or click
  or the Save
button again. To exit without saving, press END or click
  or the Cancel
button.
The following icons are also available for use on the toolbar (unless disabled in Add mode or until a record has been selected):
 List Miscellaneous Vendors:
See Miscellaneous Vendors List
for further information.
 Display Misc Vendor
Audit Info: See Audit
Info for further information.
Click the appropriate icon to perform the desired operation (which first saves the current record if applicable), after which you will return to where you are.